How to Implement OTP View in Android?

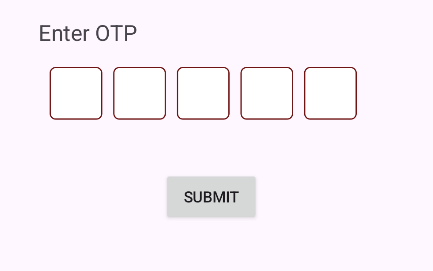
An OTP View in Android is a widget that allows users to enter their PIN, OTP, and so on. They are primarily used for two-factor authentication or phone number verification via OTP. A sample movie is provided below to give you an idea of what we are going to do in this tutorial.

In this article, you will learn how to create your otp activity in Android. So let’s take example of otp activity codes  in Android of Mobile application

Example of  OTP


add below dependencies
 implementation(group = "com.github.mukeshsolanki.android-otpview-pinview", name = "otpview", version = "3.1.0")
Step-by-Step Implementation

 Step 1: Create a New Project in Android ​studio (File >new  project). 


Step 2: Create an activity_main.xml file in your layout folder . path (res>layout)

Implement the same in​voke the following code inside activity_main.xml file. 

 <?xml version="1.0" encoding="utf-8"?>
<androidx.constraintlayout.widget.ConstraintLayout
xmlns:android="http://schemas.android.com/apk/res/android"
xmlns:app="http://schemas.android.com/apk/res-auto"
xmlns:tools="http://schemas.android.com/tools"
android:layout_width="match_parent"
android:layout_height="match_parent"
tools:context=".MainActivity">

<androidx.appcompat.widget.AppCompatTextView
android:id="@+id/appCompatTextView"
android:layout_width="wrap_content"
android:layout_height="wrap_content"
android:layout_marginStart="48dp"
android:layout_marginTop="96dp"
android:text="Enter OTP"
android:textSize="20sp"
app:layout_constraintStart_toStartOf="parent"
app:layout_constraintTop_toTopOf="parent" />

<com.mukeshsolanki.OtpView
android:id="@+id/otp_view"
android:layout_width="wrap_content"
android:layout_height="wrap_content"
android:layout_marginTop="8dp"
android:inputType="text"
android:itemBackground="@drawable/round_corner"
android:padding="10dp"
android:textAllCaps="true"
android:textColor="@android:color/white"
app:OtpHideLineWhenFilled="true"
app:OtpItemCount="5"
app:OtpItemSpacing="10dp"
app:OtpLineColor="#6F1313"
app:OtpState_filled="true"
app:OtpViewType="none"
app:layout_constraintEnd_toEndOf="parent"
app:layout_constraintHorizontal_bias="0.428"
app:layout_constraintStart_toStartOf="parent"
app:layout_constraintTop_toBottomOf="@+id/appCompatTextView"
tools:ignore="MissingClass,MissingConstraints" />

<androidx.appcompat.widget.AppCompatButton
android:layout_width="wrap_content"
android:layout_height="wrap_content"
android:layout_marginTop="36dp"
android:text="submit"
app:layout_constraintEnd_toEndOf="parent"
app:layout_constraintHorizontal_bias="0.498"
app:layout_constraintStart_toStartOf="parent"
app:layout_constraintTop_toBottomOf="@+id/otp_view" />

</androidx.constraintlayout.widget.ConstraintLayout>
Step 3: Create an MainActivity.kt file in your package folder .

Implement the same invoke the fol​lowing code inside MainActivity.kt file

 import android.annotation.SuppressLint
import android.os.Bundle
import android.widget.TextView
import android.widget.Toast
import androidx.appcompat.app.AppCompatActivity

class MainActivity : AppCompatActivity() {

@SuppressLint("MissingInflatedId")
override fun onCreate(savedInstanceState: Bundle?) {
super.onCreate(savedInstanceState)
setContentView(R.layout.activity_main)
val otp_view = findViewById<TextView>(R.id.otp_view)
val btnsubmit = findViewById<TextView>(R.id.btnsubmit)
btnsubmit.setOnClickListener {
Toast.makeText(this@MainActivity, otp_view.text, Toast.LENGTH_SHORT).show()
}

}
}

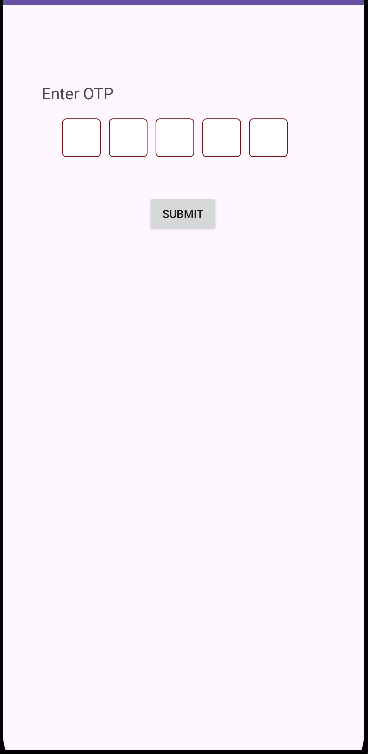
Step 4 : Output of above example.


Happy coding!

365Bloggy July 18, 2024
Share this post
Tags
SUBSCRIBE THIS FORM


Archive