Navigation has a role in mobile application development. It works to navigate to different screens or destinations.
The Android navigation component is one of the most useful and it’s developed by android jetpack. In this tutorial, we will explore how to integrate the Android navigation component into your app.
Step 1: Add dependencies to use android navigation we must have added dependencies to our project. Open the build.gradle then find the dependencies part or add the below code.
dependencies {
def nav_version = "x.x.x" // Find letest version of google
// navigation ktx
implementation "androidx.navigation:navigation-fragment-ktx:$nav_version"
// navigation ui
implementation "androidx.navigation:navigation-ui-ktx:$nav_version"
}
Step 2: After adding dependencies sync now.

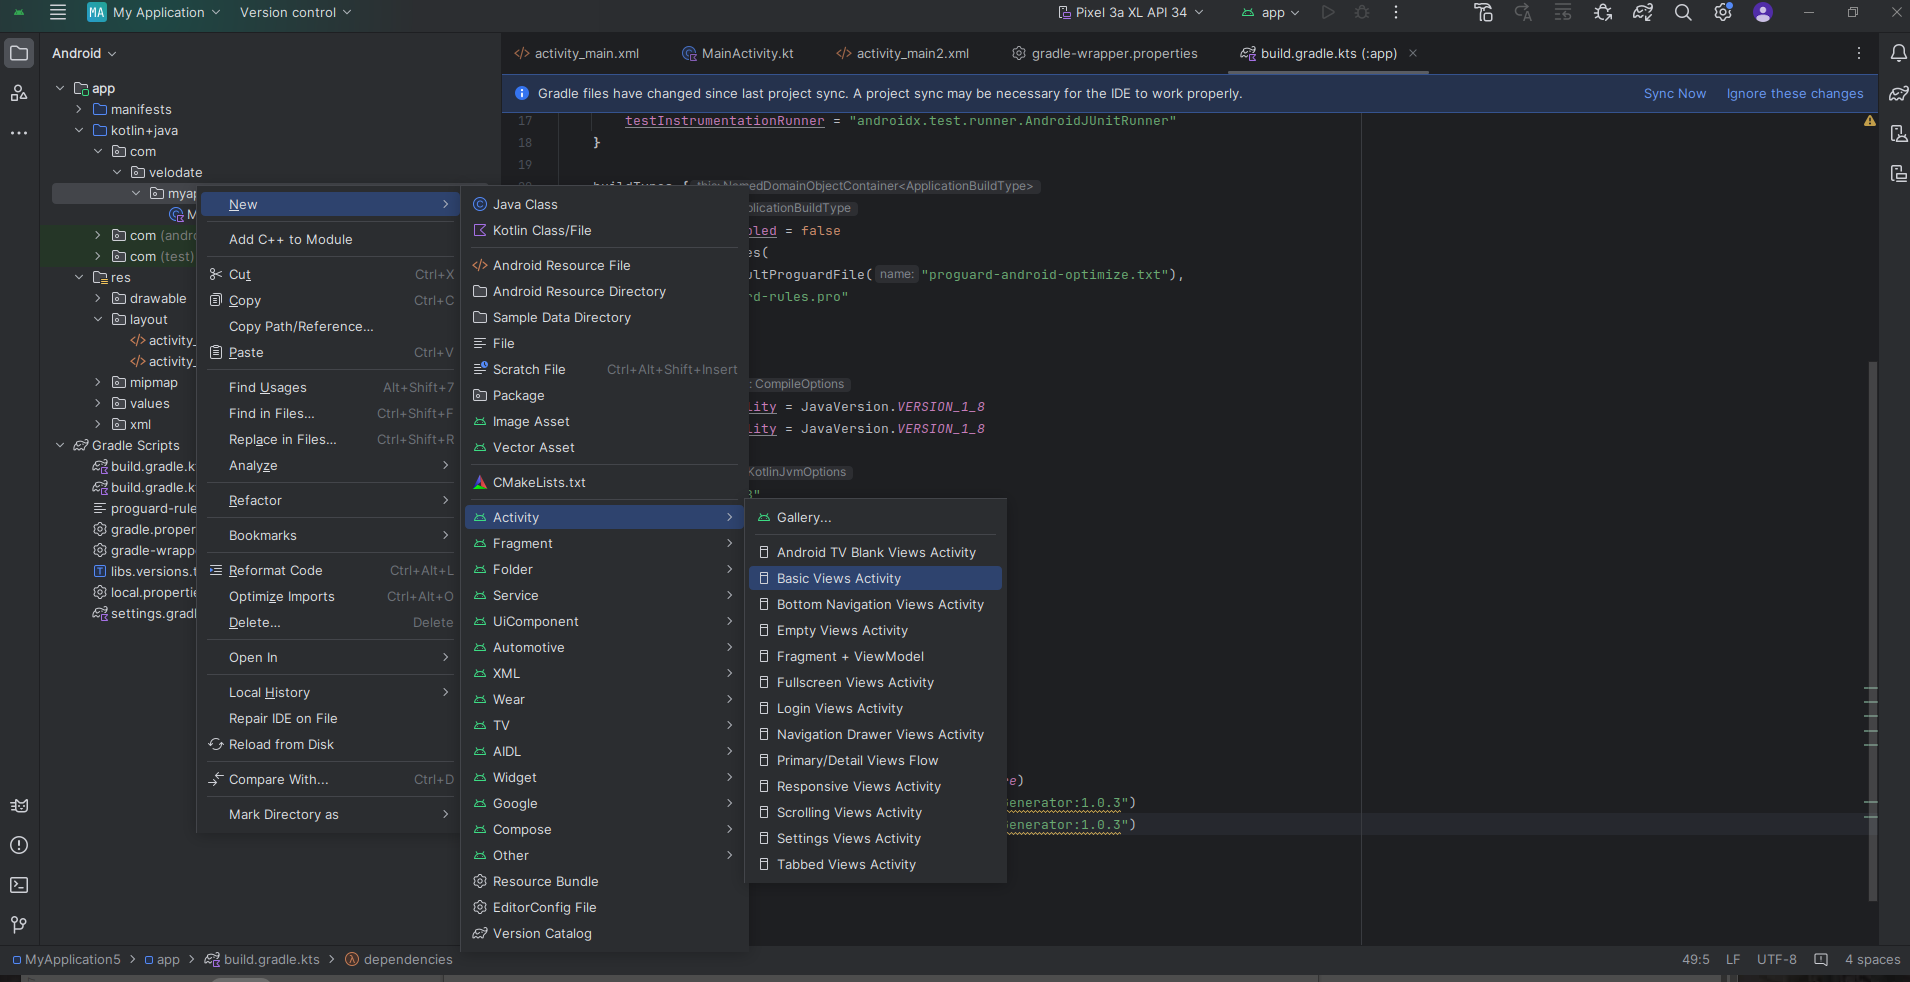
Step 3: Existing project New -> Activity -> Basic view activity.

Step 4: Create a file content_main.xml in the layout folder.
<?xml version="1.0" encoding="utf-8"?>
<androidx.constraintlayout.widget.ConstraintLayout xmlns:android="http://schemas.android.com/apk/res/android"
xmlns:app="http://schemas.android.com/apk/res-auto"
android:layout_width="match_parent"
android:layout_height="match_parent"
app:layout_behavior="@string/appbar_scrolling_view_behavior">
<fragment
android:id="@+id/nav_host_fragment_content_main"
android:name="androidx.navigation.fragment.NavHostFragment"
android:layout_width="0dp"
android:layout_height="0dp"
app:defaultNavHost="true"
app:layout_constraintBottom_toBottomOf="parent"
app:layout_constraintEnd_toEndOf="parent"
app:layout_constraintStart_toStartOf="parent"
app:layout_constraintTop_toTopOf="parent"
app:navGraph="@navigation/nav_graph" />
</androidx.constraintlayout.widget.ConstraintLayout>
Step 5: Create a file activity_main.xml in the layout folder.
<?xml version="1.0" encoding="utf-8"?>
<androidx.coordinatorlayout.widget.CoordinatorLayout xmlns:android="http://schemas.android.com/apk/res/android"
xmlns:app="http://schemas.android.com/apk/res-auto"
xmlns:tools="http://schemas.android.com/tools"
android:layout_width="match_parent"
android:layout_height="match_parent"
android:fitsSystemWindows="true"
tools:context=".MainActivity2">
<com.google.android.material.appbar.AppBarLayout
android:layout_width="match_parent"
android:layout_height="wrap_content"
android:fitsSystemWindows="true">
<com.google.android.material.appbar.MaterialToolbar
android:id="@+id/toolbar"
android:layout_width="match_parent"
android:layout_height="?attr/actionBarSize" />
</com.google.android.material.appbar.AppBarLayout>
<include layout="@layout/content_main" />
</androidx.coordinatorlayout.widget.CoordinatorLayout>
Step 6: Create a file firstfragment.xml in the layout folder.
<?xml version="1.0" encoding="utf-8"?>
<androidx.core.widget.NestedScrollView xmlns:android="http://schemas.android.com/apk/res/android"
xmlns:app="http://schemas.android.com/apk/res-auto"
xmlns:tools="http://schemas.android.com/tools"
android:layout_width="match_parent"
android:layout_height="match_parent"
tools:context=".FirstFragment">
<androidx.constraintlayout.widget.ConstraintLayout
android:layout_width="match_parent"
android:layout_height="match_parent"
android:padding="16dp">
<Button
android:id="@+id/button_first"
android:layout_width="wrap_content"
android:layout_height="wrap_content"
android:text="@string/next"
app:layout_constraintBottom_toTopOf="@id/textview_first"
app:layout_constraintEnd_toEndOf="parent"
app:layout_constraintStart_toStartOf="parent"
app:layout_constraintTop_toTopOf="parent" />
<TextView
android:id="@+id/textview_first"
android:layout_width="wrap_content"
android:layout_height="wrap_content"
android:layout_marginTop="16dp"
android:text="@string/lorem_ipsum"
app:layout_constraintBottom_toBottomOf="parent"
app:layout_constraintEnd_toEndOf="parent"
app:layout_constraintStart_toStartOf="parent"
app:layout_constraintTop_toBottomOf="@id/button_first" />
</androidx.constraintlayout.widget.ConstraintLayout>
</androidx.core.widget.NestedScrollView>
Step 7: Create a file secondfragment.xml in the layout folder.
<?xml version="1.0" encoding="utf-8"?>
<androidx.core.widget.NestedScrollView xmlns:android="http://schemas.android.com/apk/res/android"
xmlns:app="http://schemas.android.com/apk/res-auto"
xmlns:tools="http://schemas.android.com/tools"
android:layout_width="match_parent"
android:layout_height="match_parent"
tools:context=".SecondFragment">
<androidx.constraintlayout.widget.ConstraintLayout
android:layout_width="match_parent"
android:layout_height="match_parent"
android:padding="16dp">
<Button
android:id="@+id/button_second"
android:layout_width="wrap_content"
android:layout_height="wrap_content"
android:text="@string/previous"
app:layout_constraintBottom_toTopOf="@id/textview_second"
app:layout_constraintEnd_toEndOf="parent"
app:layout_constraintStart_toStartOf="parent"
app:layout_constraintTop_toTopOf="parent" />
<TextView
android:id="@+id/textview_second"
android:layout_width="wrap_content"
android:layout_height="wrap_content"
android:layout_marginTop="16dp"
android:text="@string/lorem_ipsum"
app:layout_constraintBottom_toBottomOf="parent"
app:layout_constraintEnd_toEndOf="parent"
app:layout_constraintStart_toStartOf="parent"
app:layout_constraintTop_toBottomOf="@id/button_second" />
</androidx.constraintlayout.widget.ConstraintLayout>
</androidx.core.widget.NestedScrollView>
Step 8: Create a file firstfragment.java in yourpackagefolder(com.demo) folder.
import android.os.Bundle;
import android.view.LayoutInflater;
import android.view.View;
import android.view.ViewGroup;
import androidx.annotation.NonNull;
import androidx.fragment.app.Fragment;
import androidx.navigation.fragment.NavHostFragment;
import com.velodate.myapplication.databinding.FragmentFirstBinding;
public class FirstFragment extends Fragment {
private FragmentFirstBinding binding;
@Override
public View onCreateView(
@NonNull LayoutInflater inflater, ViewGroup container,
Bundle savedInstanceState
) {
binding = FragmentFirstBinding.inflate(inflater, container, false);
return binding.getRoot();
}
public void onViewCreated(@NonNull View view, Bundle savedInstanceState) {
super.onViewCreated(view, savedInstanceState);
binding.buttonFirst.setOnClickListener(v ->
NavHostFragment.findNavController(FirstFragment.this)
.navigate(R.id.action_FirstFragment_to_SecondFragment)
);
}
@Override
public void onDestroyView() {
super.onDestroyView();
binding = null;
}
}
Step 9: Create a file secondfragment.java in yourpackagefolder(com.demo) folder.
import android.os.Bundle;
import android.view.LayoutInflater;
import android.view.View;
import android.view.ViewGroup;
import androidx.annotation.NonNull;
import androidx.fragment.app.Fragment;
import androidx.navigation.fragment.NavHostFragment;
import com.velodate.myapplication.databinding.FragmentSecondBinding;
public class SecondFragment extends Fragment {
private FragmentSecondBinding binding;
@Override
public View onCreateView(
@NonNull LayoutInflater inflater, ViewGroup container,
Bundle savedInstanceState
) {
binding = FragmentSecondBinding.inflate(inflater, container, false);
return binding.getRoot();
}
public void onViewCreated(@NonNull View view, Bundle savedInstanceState) {
super.onViewCreated(view, savedInstanceState);
binding.buttonSecond.setOnClickListener(v ->
NavHostFragment.findNavController(SecondFragment.this)
.navigate(R.id.action_SecondFragment_to_FirstFragment)
);
}
@Override
public void onDestroyView() {
super.onDestroyView();
binding = null;
}
}
Step 10: Create a file Mainactivity.java in yourpackagefolder(com.demo) folder.
import android.os.Bundle;
import com.google.android.material.snackbar.Snackbar;
import androidx.appcompat.app.AppCompatActivity;
import android.view.View;
import androidx.navigation.NavController;
import androidx.navigation.Navigation;
import androidx.navigation.ui.AppBarConfiguration;
import androidx.navigation.ui.NavigationUI;
import com.velodate.myapplication.databinding.ActivityMain3Binding;
public class MainActivity2 extends AppCompatActivity {
private AppBarConfiguration appBarConfiguration;
private ActivityMain3Binding binding;
@Override
protected void onCreate(Bundle savedInstanceState) {
super.onCreate(savedInstanceState);
binding = ActivityMain3Binding.inflate(getLayoutInflater());
setContentView(binding.getRoot());
setSupportActionBar(binding.toolbar);
NavController navController = Navigation.findNavController(this, R.id.nav_host_fragment_content_main);
appBarConfiguration = new AppBarConfiguration.Builder(navController.getGraph()).build();
NavigationUI.setupActionBarWithNavController(this, navController, appBarConfiguration);
}
@Override
public boolean onSupportNavigateUp() {
NavController navController = Navigation.findNavController(this, R.id.nav_host_fragment_content_main);
return NavigationUI.navigateUp(navController, appBarConfiguration)
|| super.onSupportNavigateUp();
}
}
Step 11: Create a file nav_graph.xml in the navigation folder.
<?xml version="1.0" encoding="utf-8"?>
<navigation xmlns:android="http://schemas.android.com/apk/res/android"
xmlns:app="http://schemas.android.com/apk/res-auto"
xmlns:tools="http://schemas.android.com/tools"
android:id="@+id/nav_graph"
app:startDestination="@id/FirstFragment">
<fragment
android:id="@+id/FirstFragment"
android:name="com.velodate.myapplication.FirstFragment"
android:label="@string/first_fragment_label"
tools:layout="@layout/fragment_first">
<action
android:id="@+id/action_FirstFragment_to_SecondFragment"
app:destination="@id/SecondFragment" />
</fragment>
<fragment
android:id="@+id/SecondFragment"
android:name="com.velodate.myapplication.SecondFragment"
android:label="@string/second_fragment_label"
tools:layout="@layout/fragment_second">
<action
android:id="@+id/action_SecondFragment_to_FirstFragment"
app:destination="@id/FirstFragment" />
</fragment>
</navigation>
Step 12: The navgraph looks like below.

The Navigation Component takes the complexity out of navigating between screens in your Android app. Simply create a navigation graph to define your app's flow, and the Navigation Component handles the rest.
This makes it easier to build a smooth and intuitive user experience for your app!