Open Camera and Gallery in Flutter

Flutter's image_picker module allows us to add images from the gallery. This requires you to utilise your genuine device.

In this article, you will learn how to create your Camera and Gallery in Flutter. So let’s take one example of the Camera and Gallery in Flutter of Mobile application.
                         

Step-by-Step Implementation


Step 1: Create a New Project in Android Studio (File >new flutter project).

Step 2: Adding material package

Import method the runApp method in the main function call first while run the application.

 import 'package:flutter/material.dart';

 void main() {

     runApp(RunMyApp());

 }

Step 3: Creating a stateless widget 

We can create a stateless widget that contains MaterialApp widget,AppBar,etc.

 class RunMyApp extends StatelessWidget {

     const RunMyApp({super.key});  

    @override

    Widget build(BuildContext context) {

    return MaterialApp(home);

     }

 }

Step 4: Add a package in flutter dependencies. What you need to do is place it under the dependencies: inside the pubspec.yaml file.
 dependencies:
flutter:
sdk: flutter
camera: ^0.11.0+1
image_picker: ^1.0.2
dotted_border: ^2.0.0+3
Step 5: Below code write when doing the Camera ans Gallery of other in a flutter.
  • Camera
 // get from camera
getFromCamera() async {
final pickedFile = await imagePicker.pickImage(
source: ImageSource.camera,
maxWidth: 1800,
maxHeight: 1800,
);
if (pickedFile != null) {
setState(() {
imageFile = File(pickedFile.path);
});
}
}
  •  Gallery
 // get from gallery
getFromGallery() async {
final pickedFile = await imagePicker.pickImage(
source: ImageSource.gallery,
maxWidth: 1800,
maxHeight: 1800,
);
if (pickedFile != null) {
setState(() {
imageFile = File(pickedFile.path);
});
}
}
Step 6: Final code 
 import 'dart:io';
import 'package:camera/camera.dart';
import 'package:dotted_border/dotted_border.dart';
import 'package:flutter/cupertino.dart';
import 'package:flutter/material.dart';
import 'package:image_picker/image_picker.dart';
late List<CameraDescription> _cameras;

Future<void> main() async {
WidgetsFlutterBinding.ensureInitialized();
_cameras = await availableCameras();
runApp(CameraApp());
}
class CameraApp extends StatefulWidget {
const CameraApp({super.key});

@override
_MyPageState createState() => _MyPageState();
}

class _MyPageState extends State {
File? imageFile=null;
final imagePicker = ImagePicker();

@override
Widget build(BuildContext context) {
Size size = MediaQuery.sizeOf(context);

return Scaffold(
appBar: AppBar(
title: const Text("Image Picker"),
),
body: Column(
crossAxisAlignment: CrossAxisAlignment.center,
children: [
Container(
margin: const EdgeInsets.all(20),
width: size.width,
height: 250,
child: DottedBorder(
borderType: BorderType.RRect,
radius: const Radius.circular(12),
color: Colors.blueGrey,
strokeWidth: 1,
dashPattern: const [5, 5],
child: SizedBox.expand(
child: FittedBox(
child: imageFile!= null
? Image.file(File(imageFile!.path),
fit: BoxFit.cover)
: const Icon(
Icons.image_outlined,
color: Colors.blue,
)
),
)),
),
Padding(
padding: const EdgeInsets.fromLTRB(40, 40, 40, 20),
child: Material(
elevation: 3,
borderRadius: BorderRadius.circular(20),
child: Container(
width: size.width,
height: 50,
decoration: BoxDecoration(
borderRadius: BorderRadius.circular(20),
color: Colors.blue),
child: Material(
borderRadius: BorderRadius.circular(20),
color: Colors.transparent,
child: InkWell(
splashColor: Colors.transparent,
highlightColor: Colors.transparent,
onTap: () {
showPictureDialog();
},
child: const Center(
child: Text(
'Pick Image',
style: TextStyle(
color: Colors.white,
fontWeight: FontWeight.bold),
),
),
),
),
),
),
),
Padding(
padding: const EdgeInsets.symmetric(horizontal: 40),
child: Material(
elevation: 3,
borderRadius: BorderRadius.circular(20),
child: Container(
width: size.width,
height: 50,
decoration: BoxDecoration(
borderRadius: BorderRadius.circular(20),
color: Colors.blue),
child: Material(
borderRadius: BorderRadius.circular(20),
color: Colors.transparent,
child: InkWell(
splashColor: Colors.transparent,
highlightColor: Colors.transparent,
onTap: () {
setState(() {
imageFile = null;
});
},
child: const Center(
child: Text(
'Clear Image',
style: TextStyle(
color: Colors.white,
fontWeight: FontWeight.bold),
),
),
),
),
),
),
),
],
));
}

Future<void> showPictureDialog() async {
await showDialog<void>(
context: context,
builder: (BuildContext context) {
return SimpleDialog(
title: const Text('Select Action'),
children: [
SimpleDialogOption(
onPressed: () {
getFromCamera();
Navigator.of(context).pop();
},
child: const Text('Open Camera'),
),
SimpleDialogOption(
onPressed: () {
getFromGallery();
Navigator.of(context).pop();
},
child: const Text('Open Gallery'),
),
],
);
});
}

// get from gallery
getFromGallery() async {
final pickedFile = await imagePicker.pickImage(
source: ImageSource.gallery,
maxWidth: 1800,
maxHeight: 1800,
);
if (pickedFile != null) {
setState(() {
imageFile = File(pickedFile.path);
});
}
}

// get from camera
getFromCamera() async {
final pickedFile = await imagePicker.pickImage(
source: ImageSource.camera,
maxWidth: 1800,
maxHeight: 1800,
);
if (pickedFile != null) {
setState(() {
imageFile = File(pickedFile.path);
});
}
}

}


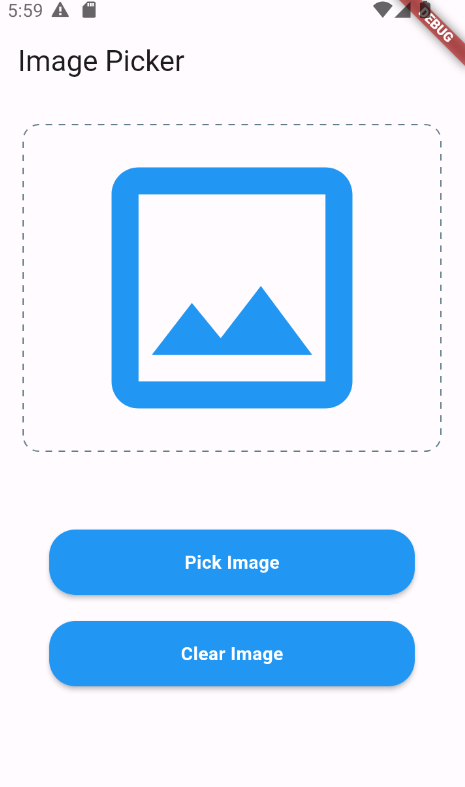
Step 7: Output of above example 


Happy coding!
365Bloggy June 11, 2024
Share this post
Tags
SUBSCRIBE THIS FORM


Archive